MacQIIME Installation
Website: http://www.wernerlab.org/software/macqiime
Introduction
The easiest way to install all of the QIIME tools on a macOS, is to use the bundled MacQIIME installation. This bundle includes all the necessary tools and dependencies to perform a comprehensive processing and analysis of 16S rRNA sequencing data. You will need macOS version 10.7 or higher.
Before proceeding a few tools are required before installing.
# Install wget
sudo easy_install wget

# Install pip
sudo easy_install pip

# Install command line tools
xcode-select --install
Note: If an error occurs when installing the Command Line Tools, then you must first install the app, XCode Application found on the Mac App Store
Step 1. Download and Install R
Step 1a: Install the R programming language on your computer. You must choose the correct installer based on the version of the macOS you have installed. Running the command below will print out a number as 10.XX.XX. This number will be important for downloading the correct software.
# Get version number of macOS
sw_vers -productVersion
macOS 10.6-10.8 : https://cloud.r-project.org/bin/macosx/R-3.2.1-snowleopard.pkg
macOS 10.9+ : https://cloud.r-project.org/bin/macosx/R-3.3.2.pkg
Step 1b. Once the R programming language has been properly installed, you can install the necessary R Packages. Multiple commands make use of the R programming environment, to take advantage of the multitude of statistical libraries. This command can be run directly in Terminal.
R -e "install.packages(c('optparse', 'gtools', 'klaR', 'RColorBrewer','survival', 'mvtnorm', 'modeltools', 'coin', 'MASS'), repos = 'http://cran.stat.ucla.edu') ; source('http://bioconductor.org/biocLite.R'); biocLite(c('metagenomeSeq', 'DESeq2', 'phyloseq', 'randomForest', 'vegan', 'ape', 'biom'))"
Step 2. Download MacQIIME
Step 2a: Download the latest version MacQIIME into your HOME folder by running the command below. (The file is large and will take some time to download.)
wget -P $HOME ftp://ftp.microbio.me/pub/macqiime-releases/MacQIIME_1.9.1-20150604_OS10.7.tgz
Step 2b: Once the file has been completely downloaded, we next need to decompress and extract the contents of the zipped folder (.tgz). Run the command below to decompress the folder using Terminal.
tar -xvf $HOME/MacQIIME_1.9.1-20150604_OS10.7.tgz
Step 2c. Change directory cd into the uncompressed folder so that we can run commands without having to specify all the levels of folders.
cd $HOME/MacQIIME_1.9.1-20150604_OS10.7
Step 3. Install MacQIIME (macOS 10.7 - 10.10)
Step 3a. Run the command and follow the steps to start the installation. Hit Enter to install MacQIIME and enter your system's password.
bash install.s
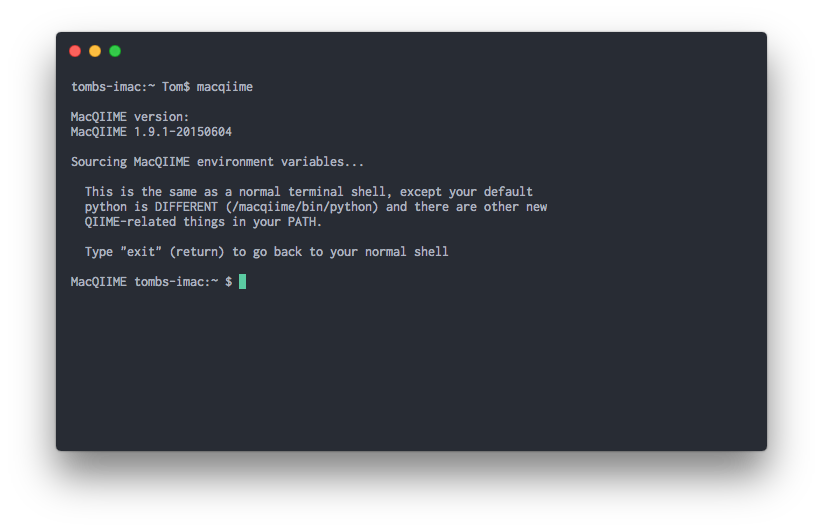
Step 3b. Close and restart Terminal. To verify a correct installation, restart Terminal and run the command macqiime and you should see multiple messages stating you are in the MacQIIME environment.
macqiime

Step 3. Installation (macOS 10.11 - 10.12)
Step 3a. Copy the MacQIIME files to your home directory.
# Copy folder to home directory
rsync -a ./macqiime $HOME
Step 3b. For users using macOS 10.11+, typing macqiime in Terminal will not initialize the MacQIIME environment. To restore this feature, run the commands below in a new Terminal session.
# Change permission on .bash_profile to make sure you are the owner
sudo chown $(whoami) $HOME/.bash_profile

# Add shortcut to profile
echo "alias macqiime='source $HOME/macqiime/configs/bash_profile.txt'" >> $HOME/.bash_profile

# Source profile
source $HOME/.bash_profile
Step 3c. Close and restart Terminal. To verify a correct installation, restart Terminal and run the command macqiime. You will not see the startup screen, but will see the name MacQIIME in the begining of the command line prompt.
Step 4. Install Legacy BLAST (Optional)
This step is required if you are using ChimeraSlayer to remove sequence Chimeras. ChimeraSlayer needs to have a legacy version of BLAST installed to work properly.
Step 4a. Start MacQIIME and install BLAST package
# Start MacQIIME
macqiime

# Install legacy BLAST into MacQIIME
conda install -c biocore blast-legacy=2.2.22 --yes
Step 4b. After installation verify the system can recognize the Blast installation folder by running the command below in a new Terminal session.
which blastall
# /Users/[Your username]/blast-2.2.22/bin/blastall
Step 5. Install USEARCH (Optional)
This step is required if you are using USEARCH for the removal of sequence Chimeras or for alternative OTU picking. USEARCH is a commercial program, but can be used for academic purposes. Due to this restriction, you must manually download the files and add them to your system. There are 2 versions that are required but both can be installed at the same time.
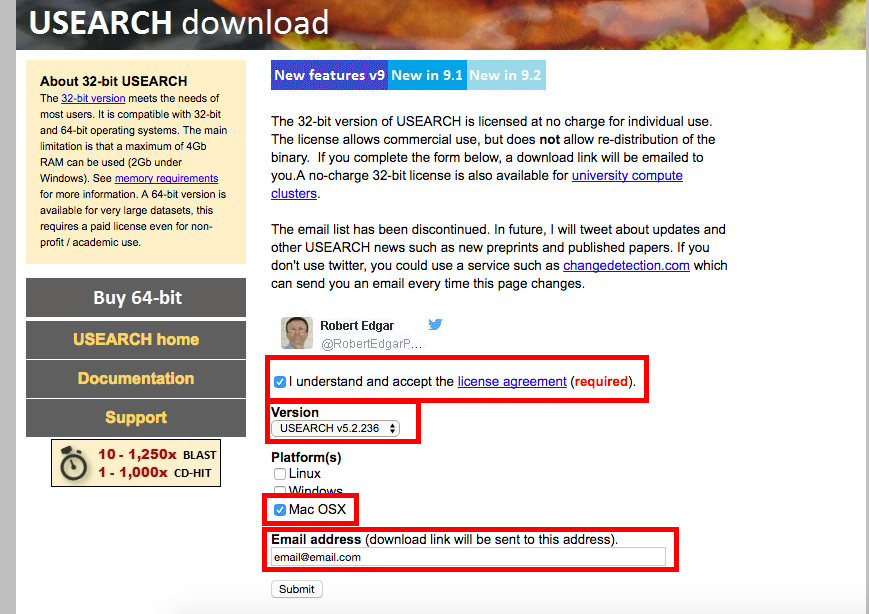
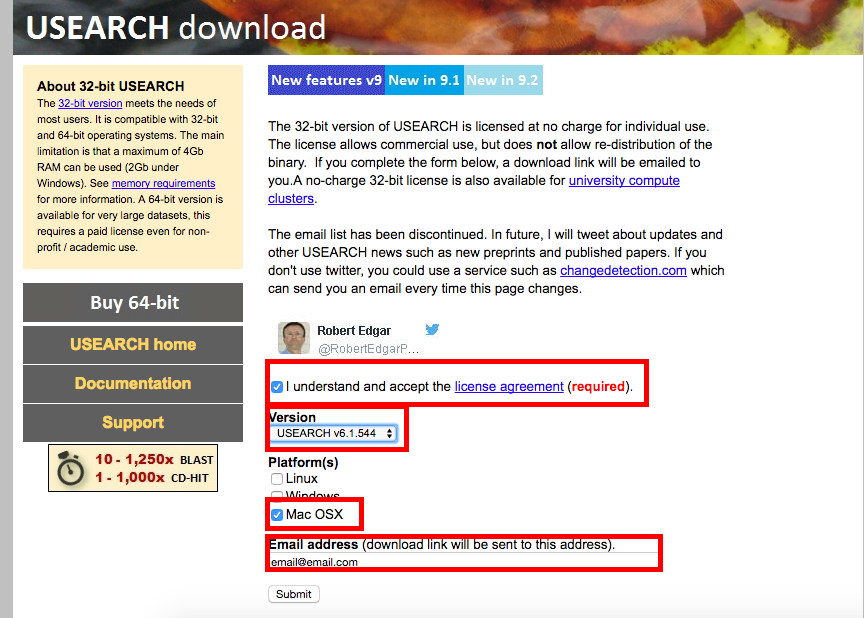
Step 5a. Go to http://www.drive5.com/usearch/download.html and download USEARCH v5.2.236 and USEARCH v6.1.544. You must accept the license agreement and enter you email address to receive the download.
Note: You must do this for both USEARCH v5.2.236 and USEARCH v6.1.544
USEARCH v5.2.236

USEARCH v6.1.544

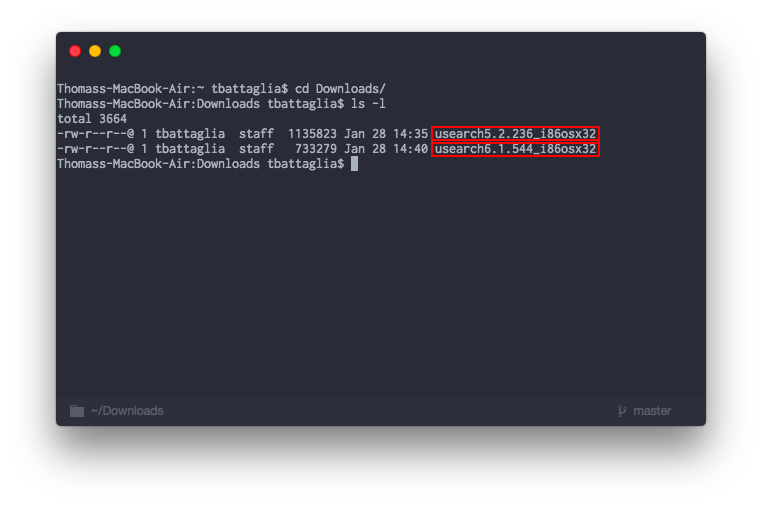
Step 5b. When you recieve the email to download, save the files into you Downloads folder. Next change directory ( cd ) into the Downloads folder. You should have see both files when you run the command to list the files ( ls -l )

Step 5c. Next we are going to change the names of the files and then move them to a folder so the system can recognize the program.
USEARCH5
# Rename USEARCH5 to just usearch
mv usearch5.2.236_i86osx32 usearch

# Change the file so it can be run
chmod +x usearch

# Copy the file to a new folder and enter password
sudo cp usearch /usr/local/bin
USEARCH6
# Rename USEARCH6 to just usearch61
mv usearch6.1.544_i86osx32 usearch61

# Change the file so it can be run
chmod +x usearch61

# Copy the file to a new folder and enter password
sudo cp usearch61 /usr/local/bin
Step 5d. Verify the program by checking the version number.
usearch -version
#> usearch v5.2.236

usearch -version
#> usearch_i86osx32 v6.1.544
Additionally you can test MacQIIME for any error recognizing the installation.
# Start macqiime
macqiime

# Print QIIME's configuration
print_qiime_config.py -tf